“Godfather” Orzo Salad

Maple Scotch Orzo Salad

This salad is inspired by a beverage called “The Godfather” (no, not the movie). The blend of smokey Scotch and fruity sweet Amaretto create a perfect balance. Of course this makes a perfect salad! A blend of Scotch, Canadian Maple Syrup, a little soy sauce and other fun things, the dressing combines the sweet and smokey to mimic the drink.

But it doesn’t end there! The other ingredients in the salad contribute to the sweet and smokey theme as well.

Like the last orzo salad I posted, this one features some grilled veggies – but the secret ingredient is apricot, whose sweetness is important to this dish. Sweet sweet apricots, covered in grill marks… heaven!

Grilling Apricots

Perfectly grilling apricots.

This being my first time grilling apricots, I really had no idea how long to leave them on for. Of course, I screwed it up! I first grilled them butt-side down for a few minutes, then turned them over onto the cut side… and quickly realized I needed to pull them off immediately. Most of them were reduced to a soup – still delicious, but wouldn’t hold their shape. I ended up grilling a second batch of apricots – just 1-2 minutes, cut-side down. Perfect.

stuff

Grilled Tomatoes and Apricots

Grilled tomatoes and apricots. I think I may have overdone the apricots a little.

To round this out, I also grilled up some fresh zucchini and tomatoes I got from the farmer’s market, along with some portabello mushrooms. Hindsight being what it is, I would have scooped out the tomatoes a little and drained the excess liquid off of the other veggies before I cut them to put into the salad. My salad ended up a little bit wetter than I would have liked, but still so so good!

So have a Godfather – or have some Godfather Orzo salad!

Recipe after the jump!

Continue reading “Godfather” Orzo Salad

Daring Pierogi Ontariana

Pierogi Ontariana

The August 2010 Daring Cooks’ challenge is to make pierogi from scratch, highlighting flavours and ingredients from where you live.

I grew up eating handmade pierogi from the Ukranian church around the corner from our house. They were fairly traditional, cheese and potato, and very good. I don’t think I realized how good they were until I started buying pierogi from the freezer section of my grocery store. Not quite so good, but edible. Years later, we found incredible pierogi from a vendor at St. Lawrence Market and we’ve been buying his ever since – saurkraut & mushroom, and jalapeno & cheddar. Amazing.

I was tempted to try making saurkraut & mushroom pierogi for this challenge, but then I realized I probably couldn’t compete with the market guy and might end up disappointed. Instead, I chose to go with the ‘local flavours’ theme and use things that I could get from my garden or from the farmers at the market.

Today’s pierogi are filled with ingredients that are local to my home province – Ontario, Canada.

Pierogi Ontariana - Filling Ingredients

I came up with a combination of potato, sweet potato, rosemary, crunchy garlic scapes, Canadian old white cheddar and onions caramelized in maple syrup and Ontario beer. This combination of flavours is more like what I would have in the Fall, but all of these things are fresh and local now. I was really happy with how the filling turned out. I could taste the hint of maple syrup and beer, I could feel the slight texture added by the garlic scapes, the woodiness of rosemary and thyme, and the creaminess of the blend of potatoes.

With that taken care of, I had to tackle the dough. I’ve made fresh pasta before, but that dough is drier and I found the pierogi dough to be more difficult to handle.

Pierogi Ontariana -rolling pin

The dough was very sticky, and I had to add a LOT more flour to it. Apparently, this isn’t the way to do it — you’re supposed to slowly add the water to the flour and monitor the texture of the dough in the early stages, so you don’t have to try to ‘correct’ it with more flour later on. I’m learning as I go.

Pierogi Ontariana - pierogi mold

I had a bit of trouble rolling out the dough – the gluten had been worked enough to make it pretty elastic, and it wasn’t easy to roll it out thin. As a result, some of my pierogi were thinner than others. We also had quite  bit of the filling left over when we were done. I could have made another batch of dough, but instead we made croquettes with it the next night.

I always enjoy these kinds of meals. It’s a great project on a rainy day, and I find it almost therapeutic as you get into the process. Roll out the dough, cut the circles, add some filling, fold it over, pinch. Lather, rinse, repeat. It’s a great break from the computer.

In the end, the pierogi were declicious, imperfections and all. We topped them with some thick Balkan-style yogurt and green onions. I took half of the batch and froze it, so we would have some to enjoy later. We’ll see how well they freeze — I have a feeling they’ll be just fine, and I’ll be happy to enjoy the results of my hard work for a second time!

The August 2010 Daring Cooks’ Challenge was hosted by LizG of Bits n’ Bites and Anula of Anula’s Kitchen. They chose to challenge Daring Cooks to make pierogi from scratch and an optional challenge to provide one filling that best represents their locale.

Recipe after the jump!

Continue reading Daring Pierogi Ontariana

Grainy Mustard Potato Salad

Grainy Mustard Potato Salad

Potato salad is one of those typical summer things. I love a traditional potato salad, full of cooked egg and mayo, but sometimes you want something a little different. This potato salad contains no mayo, instead using deliciously tart yogurt for the creamy dressing. Like the traditional, this salad gets much flavour from mustard, but this time using grainy mustard for added texture. To top it off, some fresh tarragon (from the garden! woo!) and sour green apples give it a little kick.

When I first made this dish, modified from one we saw on TV many many years ago, I used Kozlik’s “Sweet & Smokey” mustard, purchased from the St. Lawrence Market here in Toronto. I don’t happen to have any on hand this time around (if only I had planned this in advance a little!), so I’ve added a couple of sweet & smoky elements to make up for it. If you are lucky enough to be able to find Kozlik’s mustards, I highly recommend using “Sweet & Smokey” in this recipe.

This dish reminds me of the first time I had the salad that serves as inspiration for this one. It was made for my university graduation, alongside some incredible grilled portabello mushrooms. That version of the salad had mayo, and a few other differences that I can’t recall (it really has been that long…), but it was a great starting point for me to explore alternatives to ye olde potato salad. I’ve been making it ever since.

Recipe after the jump!

Continue reading Grainy Mustard Potato Salad

Daring Nut Butt

Rice Noodle Salad with Thai-style Cashew sauce and Shrimp

This month, we dare to make our own nut butters, and use them in a savoury dish. I’ve done the peanut sauce thing before, and have used ground almonds to thicken curries (almost counts as a nut butter… almost more of a nut flour, but close enough!). I’m totally open to having a nutty dinner.

Being busy as I have been lately, I took the path of least resistance and used cashew butter in a Thai-inspired noodle salad (one of the recommended recipes). I know I should have picked something a little more challenging for myself, but how could I resist a simple meal that was destined to be amazing?

Amazing it was. I am a sucker for this kind of thing.

Daring Cashew Butter and Roasted Cashews

Daring Cashew Butter and Roasted Cashews

First, I had to make the cashew butter. I figured it would taste that much better if I roasted the cashews first, so I quickly pan roasted them. Some of the oils escaped in the roasting, so I had to add some vegetable oil when I made the butter. My trusty food processor was great at grinding up the cashews, but they needed the extra oil to come together properly and form a paste. I probably would have thinned it out a little more but I knew I was making a sauce next, so I didn’t worry about it too much.

I decided to follow the sauce recipe as closely as possible. I was tempted to add some of the things I add to my own sauce, like keffir lime leaf, but I stayed pretty true to the recipe. What’s the point in remaking my own sauce recipes over again? I wanted to try something new. I chickened out about the amount of garlic, though. As much as I love garlic, 8 cloves sounded a little bit steep. I used 4, and it was plenty garlicky enough.

The July 2010 Daring Cooks’ Challenge was hosted by Margie of More Please and Natashya of Living in the Kitchen with Puppies. They chose to challenge Daring Cooks to make their own nut butter from scratch, and use the nut butter in a recipe. Their sources include Better with Nut Butter by Cooking Light Magazine, Asian Noodles by Nina Simonds, and Food Network online.

Recipe after the jump!

Continue reading Daring Nut Butt

Grilled Vegetable Orzo Salad with Shrimp

Grilled Vegetable Orzo Salad with Shrimp

Today was a very summery day, so I decided to make a summer meal.

We pulled the wee BBQ out from hibernation, cleaned it off, and sparked it up. I didn’t realize how much I missed grilled vegetables until we started eating… somehow everything tastes better grilled.

Today’s meal was not unusual for us – I think I went a little overboard making orzo salads in the last couple of summers. I thought J might never want to see an orzo again, but luckily the winter was enough of a break for him.

Grilled Vegetable Orzo Salad - Shrimp

Yummy spiced grilled shrimp.

This orzo salad starred some simple grilled vegetables, some nicely spiced grilled shrimps, and an assortment of fresh herbs from my garden. This dish doesn’t have to be complicated. For once, I didn’t mix a handful of spices together or carefully follow a recipe step-by-step to make sure I didn’t mess it up.

This is less like science, and more like art. You take what you like, and toss it!

Over the course of the summer, I will be featuring a number of different orzo salads. I already know what my next one will be… Hopefully I’ll also find some other fun grain or legume salads. That’s something I’m missing from my database o’ fun.

My new thing is to mix chopped tomatoes and avocadoes and put it on top of a dish. It adds colour and freshness that I really like. I also finished the dish with a salt lightly smoked in wood from Chardonnay barrels. I forget what it’s called, but it is subtle and sooo good.

Grilled Vegetable Orzo Salad with Shrimp - long

… and now we spot the elusive wild Orzo, in its natural habitat

Grilled Vegetable Orzo Salad with Shrimp

Ingredients

  • 250g Orzo pasta, cooked and well drained
  • 1lb med-large shrimp, peeled
  • 1 medium red pepper, quartered
  • 1 medium orange pepper, quartered
  • 1 medium zucchini, halved lengthwise
  • 1/2 medium red onion, halved
  • 1 tsp paprika
  • 1/2 tsp cayenne pepper
  • 1/2 tsp chopped garlic
  • 1/2 c chopped herbs (I used basil, parsley, tarragon, mint)
  • 6 tbsp olive oil, divided (1 for the veggies, 1 for the shrimp, 4 for the dressing)
  • 3 tbsp apple cider vinegar
  • 1 small avocado, peeled and chopped
  • 8-10 grape tomatoes, halved
  • 1-2 tbsp chopped green onion (green part only)
  • salt and pepper, to taste

Preparation

  1. Toss the vegetables in a bit of oil. (I use an oil sprayer to lightly coat them).
  2. Grill until the vegetables are cooked through, and have nice grill marks. Take off the grill, allow to cool, and chop coarsely.
  3. Toss the shrimp in a bit of oil (again, I use the sprayer for this), and the paprika and cayenne.
  4. Put the shrimp on the grill, and grill until cooked through and have nice grill marks (only a couple minutes on each side).
  5. In a large bowl, toss the chopped grilled veggies, shrimp, chopped garlic and chopped herbs with the cooked orzo.
  6. In a smaller bowl, whisk together 4Tbsp of the olive oil with the apple cider vinegar. Add to the salad and toss.
  7. Season with salt & pepper, plate the salad and top with the chopped tomatoes and avocado.

Deep South Spiced Rice & Beans

Deep South Rice & Beans

Deep South Spiced Rice & Beans (p.137, Classic Vegetarian Recipes) – Being “mostly vegetarian”, I try to find recipes that include legumes of some kind. This sounded like a good dish to try, as it incorporates beans and some fresh veggies. It’s a good one for the spring, because it isn’t heavy and saucey.

This is another dish I found in one of my old, dusty cookbooks. It’s a pretty good one, but really not that much unlike things I make on my own. I actually substituted black beans for the suggested kidney beans, because that’s what I had on hand.

I love the colourful peppers in this dish. I think it’s true that the more colour in a dish, the more you want to eat it. I know I eat some things that look pretty rough – some stews and things that have a mushy brown thing going on – but I do love to add colour with veggies and herbs.

What does this dish have that I don’t usually add? Cajun spice. Until recently, I didn’t really think about Cajun spice. Then I had to make some in a pinch because the jar I thought I had was gone… Then I came across dish after dish calling for the vague “Cajun spice” (come ON people, just tell us what spices to use!). Now armed with “my own blend” and some in my spice drawer, I am prepared for such recipes.

Go Team Steph! Daring Pâté and Bread

Trout and Shrimp Pâté round

I have a bit of a history with pâté. Growing up German, I ate loads of Braunschweiger, which may be a liverwurst and not technically “pâté” per se… but kinda is pâté in its spreadable variations. I used to gross out my friends, who were normal and didn’t eat weird things like Braunschweiger.

One time in grade school, in particular, I had spooned some into a little lunch container and packed it with some crackers. Knowing what it was, and that people thought it was gross, I showed my friend Heather. She just smiled and made yummy actions. Confused, I asked her if she ate Braunchweiger… also confused, she told me she had thought it was chocolate ice cream. I totally grossed her out by telling her what it actually was. I never did figure out how she thought I kept the ice cream frozen in my bag.

Braunschweiger is one of the weirdest meat things that I missed when I stopped eating meat.

Raw Trout and Shrimp

Raw Trout and Shrimp

I can’t say I’ve tried to replace Braunschweiger with something veg. I sampled a couple of vegetarian pâtés at the Veggie Food Fair, but I never really felt the need to buy them. Now that I am an occasional meat eater, I haven’t jumped at the chance to have meat pâté again.

Not sure why, but it just hasn’t been on my radar.

Then I got the Daring Cooks‘ challenge for June. Make a pâté –  and like it! I chose to make the trout and shrimp pâté partly because it’s made up of seafood, and partly because the description claimed it was passed down through a variety of nameless people, and possibly their grandmas and their grandma’s neighbours or something. I like recipes that just randomly work their way through people.

Sourdough Ciabatta, with Vinifera

Sourdough Ciabatta, made with Vinifera flour

The second part of this challenge is to make a bread, which is where the “Team Stephfood” silliness comes in. J is the bread maker in the house, and I’m very happy to leave that to him. We opted to complete this challenge together. For his part, he made a ciabatta bread with his sourdough starter and Vinifera flour. Vinifera is neat, because it’s made from the skins of grapes. It imparts a purplish hue (depending on how much you use, and what you mix with it), and adds a tart flavour.

Trout and Shrimp Pâté on Sourdough Ciabatta, with Vinifera

Trout and Shrimp Pâté on Vinifera Sourdough Ciabatta

The bread was amazing, and added some complexity to the pairing. The pâté was very mild, and I thought it needed some extra zazz. The bread definitely helped with that.

I enjoyed this challenge. It wasn’t something I would have looked for on my own, which makes it a good challenge for me. I don’t know for sure that I will make this regularly, but we thought it was tasty and different. It definitely goes well with our ‘spread’ dinners.

Our hostesses this month, Evelyne of Cheap Ethnic Eatz, and Valerie of a The Chocolate Bunny, chose delicious pate with freshly baked bread as their June Daring Cook’s challenge! They’ve provided us with 4 different pate recipes to choose from and are allowing us to go wild with our homemade bread choice.

Canchánchara

Canchánchara

Cuba is the land of many drinks, and many dances. Even on a resort, sheltered from the “real” world, you can almost get a sense of the culture from the drinks and the dancing. The drink that people usually connect with Cuba is the Mojito – a refreshing drink with rum, lime and mint. I love Mojitos.

When in Cuba, I was introduced to another refreshing drink, the Canchánchara. Like the Mojito, it combines rum and citrus and lots of ice. It also includes honey, giving the drink a warm sweetness. The kicker is that it calls for “raw rum”, which I had never heard of before.

Cuba - Canchanchara

Canchánchara in Cuba – yup, that’s me, no makeup, hair covered from the sun.

It was so tasty and different that I decided I had to be able to make it at home. We even tried to buy a bottle from the bar at the resort. While they wouldn’t let us buy one, they did give us the name of the brand and said that we would likely find it in the airport shop. Lucky for us, we did find it! I think it cost us all of $4.

At home, I avoided opening the lonely bottle, knowing that once we finished it, we would not be able to find any more without going back to Cuba. Eventually, I gave in, and made the delicious drinks that I enjoyed on our trip!

Canchánchara

adapted from this famous recipe

Ingredients

  • 0.5 oz / 1Tbsp honey
  • 0.5 oz / 1Tbsp lemon juice
  • 1.5 oz / 3Tbsp  raw rum (I got some Sao Can raw rum in Cuba. If you don’t have raw rum, use white rum.)
  • 1 oz / 2Tbsp water (optional)
  • 1/2 cup cracked ice

Preparation

This can all be made in one glass, but I find the following steps to be the easiest (read: less sticky splash). This is definitely the best option if you are making a number of drinks at once – just pour the drink over the ice in each glass.

  1. In a measuring cup (or something else with a pour spout), add the honey and lemon juice. Stir until the honey is dissolved.
  2. Add the rum and water (if using).
  3. Add the ice to the glass you will be drinking out of, and pour the drink into the glass.

I added a purple basil leaf as a garnish, mostly for colour. I think I might try to make a purple basil Canchánchara… that would totally rock.

Adaptation – Seitan Tomato Bredie

Seitan Tomato Bredie

Since I haven’t issued myself a month-long challenge for May, I’m taking on a couple of one-off challenges. This challenge was issued by Nupur, who writes for One Hot Stove. The goal is to find a recipe posted on another blog, and change something major about it and repost, with a link to the original blog post.

This probably isn’t a surprise, but I chose to veggify a meat dish. This dish could also be made gluten-free by using a non-wheat flour to thicken at the end (er, and by not using seitan, which is basically all wheat gluten).

I chose to make a South African Tomao Bredie (stew), which was originally posted by Asha, who writes for Fork Spoon Knife.

The reason I chose this particular recipe is because it is a South African dish that makes use of many spices that I’ve been ignoring lately. This is a very aromatic dish, featuring LOTS of ginger, allspice, cloves, cardamom and peppercorns. YUM! I’ve never tried cooking any South African dishes before, so I thought this would be a great place to start.

Also, the poster wrote about the No. 1 Ladies Detective Agency books when describing why SHE chose the recipe… while I haven’t read the books, I really enjoyed the TV series on HBO (Miss 97%!). So… yes, I choose recipes for a combination of reasons, some that make sense and some that do not.

I suppose I need to adapt the inspiration for this dish as well, instead of just stealing the No. 1 Ladies Detective Agency reference… If I try really hard, I can just imagine Wikus Van De Merwe eating this (before his run-in with the aliens) in Joburg.

District 9 - Wikus Van De Merwe

Wikus Van De Merwe, from the movie District 9

This was a great dish to have on a cool fall day. Yes, I know it is the middle of May — it FEELS LIKE FALL this week! I’m trying really hard not to be angry at the weather man, filtering some of the anger into cooking. Enjoy!

Tomato Bredie

The original recipe can be found at Fork Spoon Knife.

Marinade Ingredients:

  • 1 inch chunk of ginger, minced
  • 2 tsp all spice powder
  • 1/4 tsp salt

Stew Ingredients:

  • 1 lb seitan, cut into 1″ cubes (I used this recipe)
  • 1 tsp oil
  • 4-5 whole cloves
  • 1 cinnamon stick, or 1/2 tsp ground
  • 4-5 cracked black peppercorns
  • 1 medium onions, diced
  • 1 inch chunk of ginger, minced
  • 2-3 cardamom pods
  • 6 medium tomatoes, diced, divided (4 for the stew, 2 for garnish)
  • 1 jalapeno, diced (although I don’t think the dish needs it… the ginger offers enough heat)
  • 1 cup vegetable stock
  • salt, pepper as needed
  • 3 medium potatoes, cut into 1 inch cubes
  • 1 medium green pepper, chopped
  • 1 Tbsp butter
  • 1 Tbsp flour

Aromatic Rice Ingredients:

  • 2 cardamom pods
  • 1 cinnamon stick, or 1/2 tsp ground
  • 4 cloves
  • 4 cracked peppercorns
  • 2 bay leaves
  • 1/4 tsp salt
  • 1 1/2 cups basmati rice
  • 3C water

Preparation:

  1. THE NIGHT BEFORE: Coat the seitan pieces evenly with the marinade.Cover and refrigerate overnight.
  2. Heat the oil in a deep sauté pan on med-high heat. Toast the cloves, cinnamon, whole peppercorns in the oil until you can smell the spices.
  3. Add the onions and sauté until browned.
  4. Add the seitan, ginger and cardamom and brown the seitan a little bit. Turn the heat down to medium, cover and let simmer for 5-7 minutes.
  5. Add the tomatoes, jalapeno, stock, salt and pepper and stir well. Simmer for five more minutes, stirring occasionally.
  6. Add the potatoes and simmer until they are cooked through, about 10-15 minutes.
  7. While the stew is simmering, prepare the rice:
    1. In a medium pot, heat up 1 tsp of oil. Add the spices, and cook until you start to smell them.
    2. Add the rice and salt, stir thoroughly, and let it toast a little bit (but be careful not to let it burn!)
    3. Add the water, let it come to a boil and reduce to med-low heat. Cover immediately and cook until the rice absorbs all of the water. Fluff with a fork when done.
  8. About 10 minutes into the simmering, add the green pepper.
  9. When the stew is cooked through, melt the butter in a small pan and add the flour to it. Cook for a minute and then add the roux to the stew to thicken.
  10. Once the potatoes are cooked, heat up a small pan on med-low heat to prepare a roux. Melt the butter, and add the flour, stirring constantly until it forms a thin paste. Cook for about a minute.
  11. Add the roux to the stew to thicken. Make sure it all gets incorporated into the stew, leaving no clumps.
  12. Serve over hot aromatic rice and top with some fresh diced tomato. I also added some chopped green onion and diced avocado… not sure if it’s especially authentic, but it added some nice colour and I wanted to use up an avocado.

Daring Crab Enchilladas

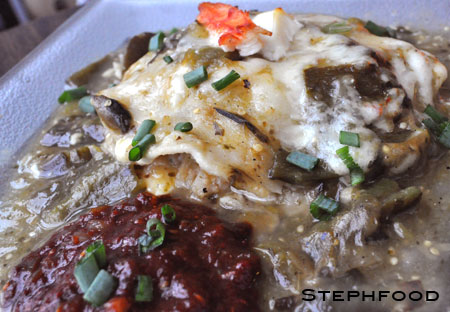
Crab Enchiladas with Ancho Salsa

Time for my third Daring Cooks challenge!!

This month’s challenge was exactly what I had been looking for…. yummy Mexican food! Toronto doesn’t have many great Mexican restaurants, unfortunately. There are a couple… and we had one that I really liked that closed a couple of years ago. Booo!

Our hosts this month, Barbara of Barbara Bakes and Bunnee of Anna+Food have chosen a delicious Stacked Green Chile & Grilled Chicken Enchilada recipe in celebration of Cinco de Mayo! The recipe, featuring a homemade enchilada sauce was found on www.finecooking.com and written by Robb Walsh.

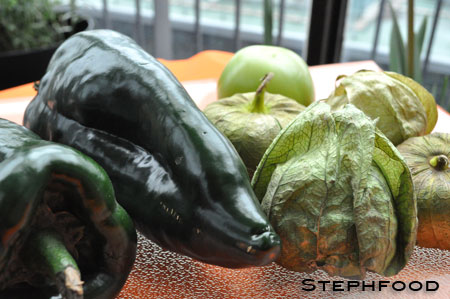
Poblanos and Tomatillos

Fresh Poblano peppers and Tomatillos

The challenge recipe was for chicken enchiladas, and of course I had to modify the recipe and swap out the chicken. I chose to make crab enchiladas instead, after a dish that I had in California and haven’t had since. These were not going to be “crab” enchiladas, but contain nice chunks of King crab. I bought some crab legs, pulled out the meat for the enchiladas and used the shells to make the broth.

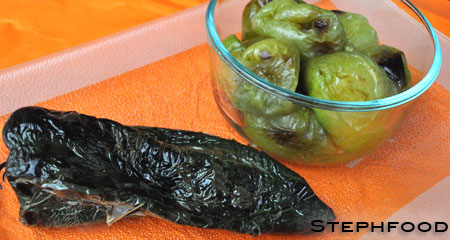
The enchilada sauce was really simple to make, but required some items that I couldn’t find in the grocery store. I ventured out to Kensington Market, where Mexican shops carry almost everything a silly Canadian girl could want… except for the Anaheim chiles. It’s ok – I got Poblanos instead. I think I secretly wanted to have to get Poblanos, after watching a show on Chile Rellenos. (I think that might be my next Mexican challenge! Yumyum!). I also got a hand full of lovely green tomatillos. These are so nice to look at (and photograph), and have a crazy tartness that you can’t get from a red tomato. The peppers and tomatillos were roasted in the oven first, the peppers were skinned and seeded and all of the ingredients were blended together.

Roasted Poblanos and Tomatillos

Oven roasted Poblano peppers and Tomatillos

Realizing how simple this was, I adapted this process to make my ancho salsa. I roasted some red tomatoes and onions, and soaked and de-seeded some dried ancho peppers. I blended it all (pulsing, rather than pureeing… I wanted to keep some of the texture). I added  a touch of ground chipotle pepper at the end, for some smokiness. SOOOO GOOOD!

Another “secret ingredient” was some crumbled queso fresco… it doesn’t melt like other cheeses, so I used a few different cheeses in this dish. Queso fresco is a fresh cheese, like Indian Paneer, so it has a bit of a grit and chew to it that is unlike other kinds of cheeses. I think this cheese is the reason you see feta sprinkled on Mexican dishes sometimes… feta is one of the closest common cheeses, when comparing flavour (saltiness) and melting properties.

This dish did take some time to make, considering the broth, roasting of peppers, assembly and baking. It would be considerably less time if I did some of these things in advance… so really not a bad dish to make when you’re having company over! We thought it looked – and tasted – really impressive.

Hm, I even think I managed to make this one totally Gluten Free! You could also make this vegetarian by substituting the seafood stock for veg, and the crab meat for either some faux meat, or some nice roasted vegetables. Maybe even beans?

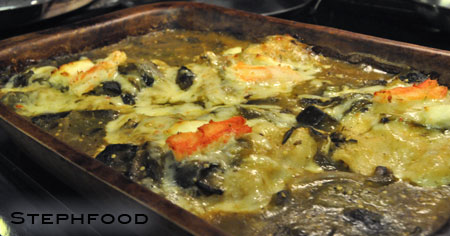
Crab Enchiladas - oven

Four crab enchiladas – fresh out of the oven!

Crab, Shrimp & Veg Stock

Ingredients:

  • 2 Tbsp oil + butter (I used 1 Tbsp of each, but you can mix it how you like. The butter adds a nice warm flavour)
  • 1 med onion, roughly chopped
  • 1 large clove of garlic, crushed
  • 2-4 loose cups of “frozen veggie bits” (see note below)
  • shells from 1LB of shrimp
  • shells from 1.5lb of king crab legs (or equivalent)
  • 1 large dried bay leaf
  • 1 Tbsp small whole black peppercorns
  • 8-10 cups of water

Pre-Preparation:

  • Crab – I’m not sure how you get crab where you live, but I started with frozen pre-steamed crab legs. If you get them fresh, you’ll want to cook them first. If you can’t get whole legs, feel free to use lump crab or canned. If you get the pre-cooked frozen crab, I would advise against steaming the legs whole – just thaw, pull crab meat out, so the only cooking will happen in the oven when assembled in the enchilada. You don’t want overcooked crab.
  • Frozen Veggie bits – If you read my blog regularly, you probably saw a post about this a week or so ago. If not, ‘frozen veggie bits’ is a bag of bits that I cut off of my vegetables when preparing them for dinner and then freeze for use in stocks. These are not rotten vegetable parts, but maybe a little drier bits, or stems, or the bits that you might not want to include in the dish. For me, this includes herb stems, mushroom stems, broccoli stalks, bits of pepper that are close to the membrane or stem, carrot peels, etc. etc.

Preparation:

  1. Heat the oil/butter in a stock pot over medium heat , until it has coated the bottom.
  2. Sauté the onion and garlic for about 5 minutes, stirring occasionally, until the onion is soft and golden. You’ll be able to smell when it is ready.
  3. Add the veg bits, shrimp and crab shells, and sauté for another 5 minutes, stirring occasionally.
  4. Add the bay leaf, peppercorns and water. Bring to a boil.
  5. Turn the heat down to low and simmer for about 1 hour.

Daring Crab Enchiladas

(with Steph’s substitutions)

Ingredients

  • 1½ pounds Poblano chiles (about 6 medium) – roast, peel, remove seeds, chop coarsely.
  • 7-8 ounces Tomatillos (about 4-5 medium) – peel, remove stems
  • 4 cups broth (see above for the recipe I used)
  • 1 clove Garlic, minced
  • ½ tsp Kosher salt (add more to taste)
  • ¼ tsp Black Pepper (add more to taste)
  • 2 tablespoons Cornstarch (dissolve in 2 tablespoons water, for thickening)
  • Hot sauce, your favorite, optional
  • Crab meat, from 1.5 lb of crab legs (shells removed, presumably these are pre-cooked and frozen crab legs)
  • 3 tablespoons Olive oil or other neutral vegetable oil (use more as needed)
  • Kosher salt and pepper
  • 12 Small Corn tortillas (5-6 inch/13-15 cm). (you can also use wheat tortillas or other wraps)
  • 6 ounces grated cheese, I used a combination of jalapeno havarti, sharp cheddar and queso fresco
  • Cilantro for garnish, chopped and sprinkled optional

Directions:

Roasting Fresh Chiles and Tomatillos

  1. Coat each chile and tomatillo with a little vegetable oil. Lay them on the grill or baking sheet (line pan with foil for simpler clean-up). Place the grill or broil close to the element, turning the chiles so they char evenly. They should be black and blistered.
  2. As they are completely charred (they will probably not all be done at once), remove the chilis to one bowl and the tomatillos to a second bowl and cover with plastic. Let them rest until they are cool. Put the tomatillos aside for now.
  3. To de-seed the chiles, pull on the stem and the seed core MAY pop out (it rarely does for me). Open the chile and remove the seeds.
  4. Turn the chile skin side up and with a paring knife, scrape away the skin. Sometimes it just pulls right off, sometimes you really have to scrape it.
  5. DO NOT RINSE!

Green Chile Sauce

  1. Take the roasted tomatillos and puree in a blender or food processor.
  2. Put the puréed tomatillos in a saucepan along with the broth, chopped and roasted green chiles, minced onion, oregano, garlic, salt and pepper.
  3. Bring to a boil over medium-high heat and then reduce the heat and simmer for 10 minutes.
  4. Add the cornstarch/water mixture and stir well. Simmer, stirring occasionally, until the sauce is thickened and reduced to 4-5 cups, another 10-15 minutes.
  5. Adjust seasonings and add hot sauce if you want a little more heat.

Stacked Green Chile and Grilled Crab Enchiladas

  1. In a small skillet, heat 3 tablespoons oil over medium-high heat until very hot. Dip the edge of a tortilla into the oil to check – it should sizzle immediately.
  2. Using tongs, put a tortilla into the pan and cook until soft and lightly brown on each side, about 15-20 seconds per side (at the most).
  3. Drain on paper towels.
  4. Add oil as needed and continue until all 12 tortillas are done.
  5. In a baking dish large enough to hold four separate stacks of tortillas, ladle a thin layer of sauce.
  6. Lay four tortillas in the dish and ladle another ½ cup (4 ounces/112 grams) of sauce over the tortillas.
  7. Divide half the crab meat among the first layer of tortillas, top with another ½ cup of sauce and 1/3 of the grated cheese.
  8. Stack another four tortillas, top with the rest of the crab meat, more sauce and another third of the cheese.
  9. Finish with the third tortilla, topped with the remaining sauce and cheese.
  10. Bake until the sauce has thickened and the cheese melted, about 20 minutes. Let rest for 5-10 minutes.
  11. To serve, transfer each stack to a plate. Spoon any leftover sauce over the stacks and sprinkle with cilantro, if you wish. The stacks may also be cooked in individual gratin dishes.