Shakshuka

Shakshuka

Shakshuka is a North African dish that is mostly eggs cooked in tomato sauce – with other things added to it to make it interesting – eaten with bread. In this case, we added colourful bell peppers, onions, and herbs. Incredibly simple – but so very good.

This recipe is a sort of “cookbook author audition” for me. There’s this cookbook I want, and the recipes look good and the photos are enticing, and the reviews have been great – but I’m still wary. Haven’t we all tried a recipe that was nearly unfollowable (if that’s a word)? I don’t have enough shelf space for books like that, so I’m holding auditions.

I’ve been lucky enough to find some recipes posted online by said cookbook author, Yotam Ottolenghi, and I’m trying a few out to see if we’ll get along. Oh yes, I think we’ll get along just fine.

This particular recipe isn’t from Jerusalem –  the book I plan to buy. It was offered online by The Guardian (and possibly in his other book, Plenty, but I’m not sure if it’s the exact same recipe). I chose it because I’ve made Shakshuka before, and wanted to compare. To make things interesting, there’s also a video of him actually making the dish – yay!

Shakshuka - close-up

A close look at the runny egg yolk

This one was fantastic. It made me want to go out and buy personal-sized cast iron pans so I can make this every day and not make a mess. Although, to be fair, there is no mess to be had now. We ate every bite, and sopped up every bit of sauce with delicious bread.

Of course this was incredibly satisfying on a cold winter night, but I can’t wait for the fresh and perfectly ripe tomatoes of summer. Heaven!

Get the recipe here:
Yotam Ottolenghi’s shakshuka recipe

Slow-Cooker Chili (a.k.a. “Tough Beans”)

Slow-Cooker Chili

In my last post, I mentioned my frustration at the length of time it took to cook legumes from dried (soaked) in my slow-cooker. I’ve done some testing, and found a method that seems to work well.

I did a bit of Googling to see if other people had the same problem…

I should have known it was an “issue” when I saw so few recipes that started with dried beans. I found a range of possible causes, such as old beans, too much salt, and too much acid.

That last one rang a bell for me – too much acid. Of the beany dishes I had made so far, the ones that resulted in tough beans contained TOMATOES. The ones that cooked perfectly did not.

I formulated a test to confirm my theory… a reworking of the chili dish that didn’t cook as expected, full of tomatoes and spices and beans. The difference would not be in the ingredients, but in the process. I started by cooking the legumes in *some* of the ingredients and some broth… and added the tomatoes in later.

It worked!

Unfortunately, this is (again) not a dish that can be done start-to-finish on a weeknight, as it would take at least 9 hours if you cook it as intended – and you have to be there to add the ingredients after 3. Being the mindful person that I am, I have included some alternative instructions for those of you starting with a cooked legume. You can always start it the night before, just to cook the beans, put it in the fridge overnight and resume cooking the next day.

A quick note… Be careful about cooking legumes from dried/soaked, using too low of a temperature may not kill the toxin described in this article on the FDA website. Using the slow-cooker on low may not be enough.


Slow-Cooker Chili

Slow-Cooker Chili

6-8 servings

Ingredients:

  • 1 onion, chopped
  • 1 celery stalk, chopped
  • 2 garlic cloves, minced
  • 1 -2 tablespoons olive oil
  • 2 cups dried legumes, soaked overnight (or 4 cups cooked)
  • 2 bay leaves
  • 2-4 cups broth (can use water) – just enough to cover
  • 2 medium carrots, chopped
  • 1 cup corn kernels
  • 1 tablespoon sweet paprika
  • 1/2 tablespoon ground ancho chile (or another mild chile pepper)
  • 1 teaspoon cumin seeds (can also use ground)
  • 1/2 teaspoon coarse salt
  • 1 teaspoon dried oregano
  • 1/2 – 1tablespoon canned chipotles in adobo, chopped or puréed – optional
  • 28oz canned tomatoes, with juices
  • 1 green bell pepper, chopped

Preparation:

Note: if you are using pre-cooked or canned beans, omit the broth and skip steps 2 and 3.

  1. Add onion, celery, garlic, olive oil, soaked beans and bay leaves to the slow-cooker.
  2. Add enough broth to fully cover the beans.
  3. Cover, and cook on the slow-cooker on high for 3 hours.
  4. When the beans have finished, add the carrots, corn, spices, canned chipotles and tomatoes to the slow-cooker.
  5. Cover, and cook in the slow-cooker on high for 6 hours.
  6. In the last hour, add bell pepper. If the chili hasn’t thickened enough, you can take the lid off to allow some of the liquid to evaporate.
  7. Taste, and adjust the seasoning as needed.

Grilled Eggplant and Haloumi Stacks

Grilled Eggplant and Haloumi Stacks

This summer was full of grilling, fresh veggies and fresh herbs. One of my favourite dishes made good use of a grillable style of cheese called Haloumi, which holds its shape during grilling and even ends up with adorable grill marks!

Grilling makes everything better. I’m pretty convinced that this is true, and so far I haven’t been challenged on it. Eggplant is one of the easiest things to grill up – it gets tender inside, and full of flavour. I was inspired by the caprese salad stacks I often make in the summer, and decided to come up with a grilled version that featured eggplant.

My introduction to Haloumi made the cheese selection simple. It was a revelation! The cheese melts just a little, and even gets the grill marks, but it doesn’t start to get oozy. You just put it straight on the grill and watch the magic happen. I tried a few different brands that were all delicious, but my favourite came from nearby Upper Canada Cheese Company. Their Guernsey Girl grillable cheese is delicious and salty, and just a little squeaky.

Grilled Eggplant and Haloumi Stacks

made with Grilled Guernsey Girl cheese from Upper Canada Cheese Company

While the cheese and the eggplant are amazing on their own, I felt they needed something to pull the dish together. I made a topping with diced tomatoes mixed with fresh chopped basil. It’s important to make this a couple of hours before you want to eat, to give the mixture some time to be totally infused with basil.

I made this dish at least a dozen times this summer, and as a result ate waay too much cheese for my own good.  Yay!


Grilled Eggplant and Haloumi Stacks

It’s best to choose an eggplant that is longer, rather than wider, with a fairly consistent diameter. This ensures your stacks are roughly the same size.

Ingredients:

  • 4-6 tomatoes, seeded and chopped
  • 1 small bunch of basil, chopped
  • pinch of sea salt
  • freshly ground pepper
  • 1 eggplant, 2 pounds, sliced into 1-inch rounds
  • 1-2 tablespoons olive oil
  • 500g haloumi cheese, or another grillable cheese, sliced 1/2 inch thick

Preparation:

  1. Mix the tomatoes with the basil, salt and pepper in a medium-sized bowl. Set aside. If your tomatoes are too watery (even after seeding), you may need to strain this mixture later on to remove the liquid.
  2. *Lightly* brush both sides of the eggplant slices with olive oil while the grill is preheating.
  3. Grill the eggplant rounds until tender, and grill the haloumi slices until softened and lightly browned on the outside. The haloumi will not melt entirely.
  4. Stack the ingredients as follows: eggplant round, haloumi slice, a teaspoon of the tomato mixture.

Moroccan Eggplant Zaalouk

Moroccan Zaalouk (Eggplant dip)

When in Morocco, we had this fantastic eggplant dip that was quite different from the babaghanoush that we’re used to. Although cold, it was more similar to a hot dish that I enjoy in Indian cuisine… so I thought I would turn it into a hot dish! Perfect for the cool fall weather…

I’ve taken a pretty long break from the blog, covering my busiest time of year at work (where did September go?) and a much needed vacation (where did October go?). During that time, cooking was either a chore or not an option. Thankfully, this has changed.

After a trip to Spain, Morocco and Portugal, I am inspired to cook many new things.

Travel inspires me to cook, for two main reasons. First, the obvious – I get inspired by things I’m eating and smelling, and it gives me the opportunity to explore the culture further after the trip has ended. The second reason I get inspired to cook is, unfortunately, bad touristy food and a lack of vegetables. Whatever the reason, I’m happy to be inspired to cook and blog!

Fes - Riad Dinner

The riad in Fes: Don’t you just want to curl up with a glass of wine and some appetizers?

Back to the Moroccan dip that inspired this post… We were brought to a guest house in the medina in Fes – a mind-boggling maze of a place. The setting was incredible and elaborate, and we were seated on the terrace, with a view of the city. The meal started with a series of cooked dips, which were lovely. I probably could have eaten a whole meal consisting only of dips. The eggplant dip was a highlight for me – cleaner tasting than babaghanoush (no creamy tahini here), and closer to Indian baingan bharta in texture.

I had a thought – what if I served this dish hot?

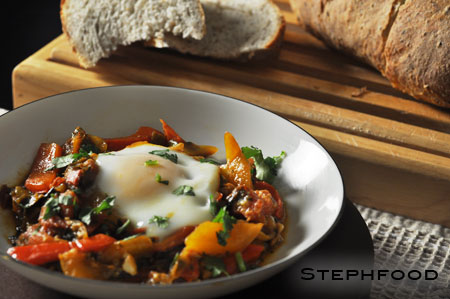
To make it more of a meal, I have added some green bell pepper and served it on top of rice. It could also be served with crusty bread instead of rice.

This is a really easy dish – and you could even roast the eggplant and tomatoes in advance and cook the dish the next day to save time and make a weeknight-friendly meal. One thing I should note – I didn’t get a big enough eggplant, so it turned out a little more tomatoey than it should have. It still tasted amazing, but I recognize that the dip we had in Fes did not have such a strong tomato flavour.

You can also be flexible with the seasoning, if you like it a little bit spicier or want to add in some Ras el Hanout.

Cold, this is a great dip to bring to a party. Hot, it’s a simple dinner option.

Moroccan Zaalouk (Eggplant dip)

Delicious hot or cold!

Moroccan Eggplant Zaalouk

Based on this recipe. This can be served hot or cold. Traditionally, it is served cold (as a dip), but it made a great hot meal with the addition of green bell pepper and served with bread or rice.

4 servings

Ingredients:

  • 1 eggplant, 2 pounds, halved lengthwise
  • 4 large tomatoes, halved lengthwise
  • 1/4 cup olive oil
  • 1 green bell pepper, chopped (optional – if making dinner, as opposed to a dip)
  • 3 cloves of garlic, finely minced
  • 1 tablespoon paprika
  • 1 tablespoon cumin
  • 1 1/2 teaspoons salt
  • 1/8 teaspoon cayenne pepper (optional)
  • 1/3 cup water
  • 1/3 cup chopped fresh cilantro and parsley, mixed
  • juice from 1/2 lemon

Preparation:

  1. Place eggplant and tomatoes skin-side up, on an oiled roasting pan. Pierce the skins with the tines of a fork. Sprinkle a bit of olive oil on top of the eggplant and tomatoes. Roast in the oven, on the top rack, under the broiler until the skin is a little bit charred, and and the meat is very tender (it took about 10 minutes for me).
  2. While the vegetables are roasting – if you will be serving this as a hot meal – lightly sauté the bell pepper in a little bit of oil. Remove from heat, and set aside.
  3. Scoop out the roasted eggplant from the skin, and peel the skins off of the tomatoes. Mash the eggplant and tomato together. Set aside.
  4. In a deep sauté pan, heat the remainder of the olive oil over medium-high heat. Add the eggplant and tomato mixture, and stir. Add the remaining ingredients, except for the lemon. Mix well, cover and cook for about 20 minutes, until the mixture is very thick and most of the liquid has been cooked off. Do not let the mixture burn – turn down the heat, if necessary.
  5. Add the green bell peppers and half of the cilantro/parsley to the mixture and heat through.
  6. Add the lemon juice and the rest of the cilantro/parsley.
  7. Serve warm or cold with crusty bread, or on top of rice.

Barley Rice Salad

Barley Rice Salad

I love barley. In the winter, I’m always making stews that overflow with barley. Until now, however, I haven’t found something to use it in during the summer months. Here, I’ve used it in a salad with some rice and veggies. Cross that one off my list of grains to try saladifying!

I’m not sure why I love barley so much. It doesn’t have a big flavour, and isn’t as versatile as rice or quinoa. I like the little chew it gives to a dish. I guess it’s as simple as that.

It seems like I’m trying to find a way to make salad out of every grain in my cupboard. Grain salads are great for me, because they make great leftovers to bring to work. I’m always thinking of what to bring for lunch the next day. I do my best to limit the number of days I have to buy lunch, so that’s really important for me.

I’ve kept the dressing very simple lately. I just restocked my apple cider vinegar, which is fantastic for salad dressing. It’s tart and acidic and has more flavour than white vinegar, so you don’t need to add many other ingredients. One reason I kept things simple – fresh basil. Our rooftop garden is overflowing with delicious basil, and I’m happy to highlight it in the salad. Nothing compares to fresh basil.

Cooking tip: cook the barley in advance and freeze in portions. Do this on a day that isn’t too hot, so you’re ready to go when you need it. I didn’t do this with the rice, because rice is quicker to cook up when you need it.

Barley Rice Salad

Barley Rice Salad meets the Garlic Scape Monster

Barley Rice Salad

4-6 servings

Ingredients:

  • 1 cup brown or mixed rice, dry (I used a fun one from Bulk Barn called Black Pearl)
  • 1 – 1.5 cups pearl barley, cooked
  • 1 cup corn kernels, cooked (can use canned, frozen, grilled)
  • 1 tablespoon finely chopped green garlic (or 1/2 teaspoon finely minced garlic clove)
  • 1/2 – 1 cup sliced fennel
  • 10-12 cherry tomatoes, quartered (and drained, if using a waterier variety)
  • 2 tablespoons basil, chiffonade or finely minced
  • 3 tablespoons extra virgin olive oil
  • 1 tablespoon apple cider vinegar
  • 1/4 teaspoon ground yellow mustard seed
  • salt and fresh ground pepper, to taste
  • pinch of cayenne, or your favourite ground chile (optional)
  • 1 cup chopped cucumber

Preparation:

  1. Cook rice using your favourite method (stovetop, rice cooker, steamed, etc.). Remove from heat, transfer rice to a large nonreactive bowl, stir in barley and set aside to cool.
  2. Meanwhile, prepare and mix together the garlic, fennel, tomatoes and basil. Stir into rice and barley mix and put in the refrigerator.
  3. In a small glass with a pour spout, whisk together the oil, vinegar, mustard powder, salt, pepper and cayenne until the mixture emulsifies (it will come together and thicken slightly). Pour dressing over salad, bit by bit, and gently toss until well coated. You may not need to use it all.
  4. Top with chopped cucumber and serve.

Related posts:

  1. Tabbouleh (Bulgur Salad) Another in a line of fresh summer salads, Tabbouleh is…
  2. Quinoa and Asparagus Salad Time for summer salads! Last year, I basically gave up…
  3. Wheat Berry Salad with Harissa “Grillin’ and salad” season is in full swing. Over the…

Related posts brought to you by Yet Another Related Posts Plugin.

Ratatouille New Year

Ratatouille

What better way to celebrate the birth of a new year than by baking layers of veggies and watching Pixar? For us, the first day of the new year was spent relaxing in jammies, and Ratatouille – the dish and the movie!

This is the first of my New Year’s resolutions to be completed. Continue reading Ratatouille New Year

Anchovy Goddess – BB7

Anchovies

“That stench… that heavenly stench!”

Yes, today I am the Goddess of Anchovies! As a part of One Hot Stove’s Blog Bites 7 : The Iron Chef Edition, I put on the crown and try using anchovies in two different dishes. Again, I’m tying together the Blog Bites entry with my ongoing love of referring to other blogs, as seen in my earlier “Blog Love” posts.

It all started when I found a blog post with a recipe for Orecchiette with Broccoli and Mushrooms on What You Having for Your Tea, a blog I subscribed to recently. We weren’t eating much pasta at the time, and this dish looked really good and fast. There was just one wee bony ingredient that I was both unsure of and intrigued by – the anchovy.

Anchovy Orecchiette

I didn’t change the recipe much – I just tossed in a few halved grape tomatoes and garlic scapes. It was incredible, and the anchovy was subtle and really interesting. It’s one of those ingredients that seems a little weird, and you figure you can make the recipe without it… which you probably could, but you’d be missing out.

I made this dish twice, and really hoped that I could use it for an upcoming Blog Bites, since the whole point is to highlight recipes from other blogs.

As it happens, this blog bites requires that we choose an ingredient and use it in two different recipes. I added to my personal challenge by requiring that I find recipes on different blogs. In fact, I’m highlighting THREE blogs today, because I took inspiration from one blog and part of the recipe from another blog.

Let me explain.

In the last few weeks, I came across this blog post on Kalyn’s Kitchen, showing a stack of green zebra tomatoes and fresh mozzarella drizzled in Green Goddess dressing. At the time, I was more drawn to the zebra tomatoes, because I love them and hadn’t seen ANY this year (still haven’t).

Jump ahead about a week, and I decide to use anchovy as my BB7 ingredient. I do a quick search of some of the blogs I frequent, and I come across another, totally unrelated blog post highlighting Green Goddess dip, on Morsels & Musings.

Goddess Stack - naked

Taking the Green Goddess dip recipe and combining it with the inspiration to stack stuff and top it with the goodness of the Goddess, you have my second dish. I stacked grilled yellow and green zucchini, sliced tomatoes and a bit of bocconcini cheese and poured some Green Goddess sauce over the top.

So good!

Goddess Stack

The moral of the story is that anchovies aren’t only Fry’s favourite extinct pizza topping, they’re also a way to add a special zip to a sauce or a simple pasta dish. Weird, but nice!

My adaptation of the Green Goddess sauce after the jump.

Continue reading Anchovy Goddess – BB7

Tomatoes in the Raw

Raw Tomato Sauce on Pasta

I’m still avoiding any extended cooking, but I realized I’ve missed having a simple pasta dinner. For anyone that knows me, you know how strange it is when I say that we haven’t made a pasta dinner all summer. I’ve had some pasta salads, sure, but it’s not quite the same thing.

A trip to the Nathan Phillips Square farmer’s market on Wednesday gave me the perfect opportunity to combine my love of pasta with my desire to not be stuck in front of a hot stove.

Tomato Basket

Tomato season is in full swing here in Ontario, and I was inundated with piles and piles of fresh, ripe tomatoes of many varieties. I bought a few piles, in three varieties. To justify this purchase, I had to think of something that would use up a bunch of them at once. A raw tomato sauce was in order!

If you’ve never had a raw tomato sauce, you might be amazed at how simple and quick it is. It’s pretty much how it sounds – a sauce made up of uncooked tomatoes. “Sauce” might be a misnomer, though, as it’s almost more of a tomato salad that you toss with hot pasta.

There – I gave away my secret.

Chopped Tomatoes

The real secret is just how amazing it tastes when you have fresh, LOCAL tomatoes on hand. Like a tomato salad, it really won’t work with mealy tomatoes, or tomatoes that spent most of their ripening on a truck. I picked up a basket of roma tomatoes for this, but you could use your favourite unmealy (is that a word?) tomato.

The recipe I used can be adapted to your taste – use the kind of tomato you like best, use the herbs you like best, the oil you like best, the shape of pasta you like best (although short stubby ones like penne seem to work best). I added in some grilled eggplant, and I think next time I might add some blanched green beans for crunch. It’s a dish that is as easy to customize as the usual pasta sauce, but without all of the stewing and cooking stuff.

Recipe after the jump!

Continue reading Tomatoes in the Raw