Lentil Salad w Fennel, Arugula, Orange

Lentil Salad w Fennel

Salad season is here, and I’m back on the hunt for salads with substance. This lentil salad is full of good stuff.

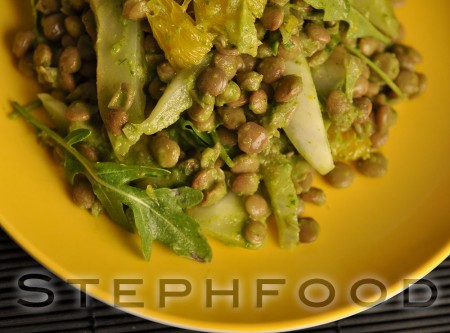
One thing you may notice when looking at the recipe… my photos are missing the feta. Man, oh, man! Don’t forget the feta! Sure, the salad was great without it, but the feta adds a great tang and saltiness that makes it so much better. Initially, I was going to leave the feta “optional”. No longer.

You are not allowed to skip the feta.

Lentil Salad w Fennel

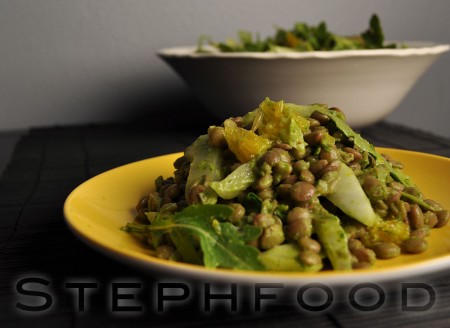
Lentil Salad w Fennel – sadly, missing the feta

I love lentils, but they feel like such a winter food. Stews, soups, rich sauces – they’re mostly associated with winter comfort food. I wanted to show how easy it is to incorporate them into summer cooking. They are so incredibly good for you, and are really quick to cook up from dry.


Lentil Salad with Fennel, Arugula and Orange

Ingredients

  • 2 cups dried lentils (green or brown)
  • 4 cups arugula
  • ⅔ cup olive oil
  • 1 large orange
  • 1 small garlic clove, peeled
  • salt and pepper, to taste
  • 1 small fennel bulb, quartered
  • feta, crumbled, to serve

Preparation

  1. Add dried lentils to a large pot of water. Bring to the boil, turn off the heat and leave for 30 minutes. The lentils should be tender, but still intact.
  2. Once cooked and drained well, put into a large bowl.
  3. While the lentils are cooking, grill the fennel quarters just until they have some grill marks on them. Remove from the grill and set aside.
  4. Zest the orange until you have 1 teaspoon. Set zest aside.
  5. Half the orange, and juice one half. You should have about ¼ cup of orange juice. Add juice to reserved zest and set aside.
  6. Carefully cut the orange segments out of the last half of the orange. Carefully peel off and discard the membrane covering the segments and pull the orange apart into smaller pieces. Add to the fennel and set aside.
  7. Put half the arugula, olive oil, garlic, and the orange zest and juice into a food processor. Process until smooth. Season with salt and pepper and gently toss with the lentils.
  8. Fold in the rest of the arugula, grilled fennel and orange segments.
  9. Crumble a bit of feta on top and serve.

Warm Chickpea Salad

Warm Chickpea Salad

Salad season is almost upon us… almost. This chickpea dish can be served warm or cold, depending on how co-operative the weather is being :)

This time around, we ate it warm.

I just got a new zester, so I’m a little obsessed with putting lemon zest in stuff. I love the blend of lemon zest, olive oil and chili flakes. Oh so good!

I’m also a sucker for nicely sautéed leeks – white AND green parts, thankyouverymuch! Sometimes I just cook up a bunch of them, and add them to every dish. It makes a really good condiment.

To prepare leeks:

  • cut off the root end, and the dried tops
  • half each leek across where the white meets the green
  • half the white part lengthwise, and do the same for the greens (by breaking them where they fold)
  • WASH LEEKS VERY VERY WELL – dirt gets into the layers of the leek, so put them under running water and wash in between the layers as best you can
  • drain well

They take a bit of prep, but are really worth it! I usually prep the whole bunch at once, and keep them in a ziplock bag in the fridge.

Warm Chickpea Salad

Warm Chickpea Salad with Tomatoes and Parsley


Warm Chickpea Salad with Tomatoes and Parsley

Ingredients

  • 1 cup coarsely chopped parsley
  • zest and juice from 1 small or 1/2 large lemon (approximately 2 Tablespoons juice,  1 Tablespoon zest)
  • 1/4 – 1/2 teaspoon chili flakes (to taste)
  • 4 Tablespoons olive oil
  • 2 cups cooked chickpeas (roughly 1 can)
  • 1 leek, sliced into 1/4″ half rings
  • 1-2 cloves garlic, minced
  • 1/2 pint grape tomatoes, halved
  • salt and pepper, to taste

Preparation

  1. Make the dressing by combining the parsley, lemon juice, half of the lemon zest, about 1/4 teaspoon of the minced garlic, chili flakes and 3 tablespoons of olive oil. Mix, and set aside.
  2. In a sauté pan, add about a tablespoon of olive oil. Sauté the leeks until softened.
  3. Add the rest of the minced garlic, lemon zest and chili flakes and cook for another minute.
  4. Add the chickpeas and cook through, stirring regularly to coat with the other ingredients. Season with salt and pepper, to taste.
  5. Toss in the cherry tomatoes, remove from heat, and immediately toss with the dressing.

This dish is great served warm or cool!

Slow-Cooker Chili (a.k.a. “Tough Beans”)

Slow-Cooker Chili

In my last post, I mentioned my frustration at the length of time it took to cook legumes from dried (soaked) in my slow-cooker. I’ve done some testing, and found a method that seems to work well.

I did a bit of Googling to see if other people had the same problem…

I should have known it was an “issue” when I saw so few recipes that started with dried beans. I found a range of possible causes, such as old beans, too much salt, and too much acid.

That last one rang a bell for me – too much acid. Of the beany dishes I had made so far, the ones that resulted in tough beans contained TOMATOES. The ones that cooked perfectly did not.

I formulated a test to confirm my theory… a reworking of the chili dish that didn’t cook as expected, full of tomatoes and spices and beans. The difference would not be in the ingredients, but in the process. I started by cooking the legumes in *some* of the ingredients and some broth… and added the tomatoes in later.

It worked!

Unfortunately, this is (again) not a dish that can be done start-to-finish on a weeknight, as it would take at least 9 hours if you cook it as intended – and you have to be there to add the ingredients after 3. Being the mindful person that I am, I have included some alternative instructions for those of you starting with a cooked legume. You can always start it the night before, just to cook the beans, put it in the fridge overnight and resume cooking the next day.

A quick note… Be careful about cooking legumes from dried/soaked, using too low of a temperature may not kill the toxin described in this article on the FDA website. Using the slow-cooker on low may not be enough.


Slow-Cooker Chili

Slow-Cooker Chili

6-8 servings

Ingredients:

  • 1 onion, chopped
  • 1 celery stalk, chopped
  • 2 garlic cloves, minced
  • 1 -2 tablespoons olive oil
  • 2 cups dried legumes, soaked overnight (or 4 cups cooked)
  • 2 bay leaves
  • 2-4 cups broth (can use water) – just enough to cover
  • 2 medium carrots, chopped
  • 1 cup corn kernels
  • 1 tablespoon sweet paprika
  • 1/2 tablespoon ground ancho chile (or another mild chile pepper)
  • 1 teaspoon cumin seeds (can also use ground)
  • 1/2 teaspoon coarse salt
  • 1 teaspoon dried oregano
  • 1/2 – 1tablespoon canned chipotles in adobo, chopped or puréed – optional
  • 28oz canned tomatoes, with juices
  • 1 green bell pepper, chopped

Preparation:

Note: if you are using pre-cooked or canned beans, omit the broth and skip steps 2 and 3.

  1. Add onion, celery, garlic, olive oil, soaked beans and bay leaves to the slow-cooker.
  2. Add enough broth to fully cover the beans.
  3. Cover, and cook on the slow-cooker on high for 3 hours.
  4. When the beans have finished, add the carrots, corn, spices, canned chipotles and tomatoes to the slow-cooker.
  5. Cover, and cook in the slow-cooker on high for 6 hours.
  6. In the last hour, add bell pepper. If the chili hasn’t thickened enough, you can take the lid off to allow some of the liquid to evaporate.
  7. Taste, and adjust the seasoning as needed.

The Bizarre Tale of Beany Brownies

Beany Brownies

I am now on the hunt for gluten-free recipes, and this is one of the first ones I chose. The clincher for me is the secret ingredient… black turtle beans. Not your usual brownie ingredient.

I love black turtle beans. I love them so much that I could probably snack on them. When I saw a brownie recipe that was mostly made up of black beans, I couldn’t imagine they would be good! I couldn’t get them out of my head, so I decided to make up a batch for Hallowe’en. It’s a simple recipe, so I really had nothing to lose.

Don’t kid yourself – these aren’t fat-free. I think the awesome power of black beans overpowers the butter and eggs, though. BAM! Superhero “brownies”!

Beany Brownies

Rich in beanly goodness

The Verdict:

Would you mistake these for regular brownies? Hells no! Are they tasty? Yes! Am I at least a little bit biased by my love of black beans? Yeah, I think so. J thought these were great, too, so you have a second opinion on the matter.


Beany Brownies

Source: this recipe

about 12 muffin-sized portions

Ingredients:

  • 1 can (15 ounces) no-salt-added black beans, drained and rinsed
  • 3 large eggs
  • 1/3 cup melted butter, more for the baking dish
  • 1/4 cup cocoa powder
  • 1/8 teaspoon teaspoon salt
  • 2 teaspoons gluten-free vanilla extract
  • 1/2 cup cane sugar
  • 1/2 cup gluten-free semi-sweet chocolate chips
  • 1/3 cup finely chopped walnuts

Preparation:

  1. Preheat oven to 350°F. Lightly grease 12 silicone muffin liners and place in a muffin tin, or on a baking sheet with a lip.
  2. In a food processor, blend the black beans, eggs, melted butter, cocoa powder, salt, vanilla extract and sugar. Allow the mixture to sit for a couple of minutes, to allow it to thicken.
  3. Stir in the chocolate chips and walnuts.
  4. Scoop out the mixture into each of the muffin liners, filling about 2/3 of the way, and top with a few more chocolate chips.
  5. Bake for 30 to 35 minutes, or until just set in the center. Allow to cool completely before eating.

Greek Fakkes (Lentil Soup)

Fakkes (Greek Lentil Soup)

Eating vegetarian can sometimes be tricky, because you have to really think about ways of getting the protein you need. On the other hand, I know so many meat eaters that don’t get enough of the nutrients you usually get from veggies! Hahaha. I guess we’re really all in the same boat here.

In the winter months, it’s easier to remember to eat legumes because they are perfect in hearty, warming dishes like Fakkes (Greek lentil soup).

Continue reading Greek Fakkes (Lentil Soup)

Great Northern Ramp Pasta

Great Northern Ramp Pasta

Good day, eh, and welcome to the Great White North. I’m Bob, and this is my brother Doug.

Our topic today, is, like, Great Northern beans and some great wild leeks, or ramps.

Don’t be a total hoser and take off without reading the rest of the post! (I promise I’ll stop it now…)
Continue reading Great Northern Ramp Pasta

Daring Confit & Cassoulet

Vegetarian Cassoulet

What the heck is a cassoulet? I had heard the word before, but wasn’t too sure what it was before it became the Daring Cooks’ challenge for January.

Cassoulet is a particular kind of white bean stew that originated in France. It’s become one of those dishes that ignite debates over who made it first, and what recipe is authentic. Sorry to offend, folks, but mine isn’t especially “authentic”, being vegetarian. There is usually a lot of meat involved.

One of the things that you see in many cassoulet recipes is duck confit. One of the requirements of the challenge was to make some kind of confit, and again there were some veggie options. I had to look up what a confit was, exactly, since I’ve always heard it associated with duck. Basically, ‘confit’ is used to describe a few things, in particular a method of preserving food by cooking it in a fat. In the case of meats, they are usually cooked in their own fats. For things like garlic, it is cooked in oil.

I made garlic confit.

Garlic Confit
Garlic Confit

So what exactly does one use garlic confit for? You can use it much the same way you might use a baked garlic – the cooking process mellows out the flavours, and gives it a creamy spreadable texture. This makes it (and the oil it’s cooked and stored in) easy to use in dips, soups, sauces… just about anything. Being a big lover of garlic, I thought this would be a fun thing to try making.

That done, I had to decide how to retain the spirit of a cassoulet without the meat. I opted to make the seitan sausages from last month’s challenge, and use them in the stew. I also added some smoked paprika to add some depth to the flavour.

I’m pretty sure it didn’t taste like a real cassoulet, but it was really good!

Vegetarian Cassoulet - closer
Vegetarian Cassoulet

Our January 2011 Challenge comes from Jenni of The Gingered Whisk and Lisa from Parsley, Sage, Desserts and Line Drives. They have challenged the Daring Cooks to learn how to make a confit and use it within the traditional French dish of Cassoulet. They have chosen a traditional recipe from Anthony Bourdain and Michael Ruhlman.

Recipes after the jump!
Continue reading Daring Confit & Cassoulet

Back to Basics: How to cook dried Chick Peas

Dried Chickpeas

Cooking chick peas (garbanzo beans) from dried is easier than I thought! The trick is in the soaking – you need to soak them for at least 24 hours before cooking. I actually soak them for 2 days, and have such great results that I keep doing it that way.

One thing to keep in mind is that they expand quite a bit – my first try was with 2 cups of dried chick peas, which yielded about 6 cups of cooked chick peas. Yikes! These days, I do 1 cup at a time.

  1. In a large bowl, add 4 cups of cool water to 1 cup of dried chick peas.
  2. Put the bowl in the fridge for at least 24 hours to soak, changing the water every day.
  3. Every once in a while, stir the chick peas around a bit.
  4. To cook, boil a large pot of water. Add the chick peas, and return to the boil. Lower the heat, and simmer for about 40 minutes – but test to get the perfect texture!

The “Back to Basics” series is a collection of simple instructions, to be used as a reference for preparing some of the ingredients in the pantry. Mostly, it’s just a way for me to keep track of some of this info because I never remember the simple stuff!

Indian Chickpea Salad

Indian Chickpea Salad

Today’s salad is inspired by Indian spices and flavour combinations. I’m obsessed with my collection of spices, and I was happy to be able to pull out some of my (recently ignored) Indian spices today.

Possibly the most exciting part for me is the amchoor powder. Amchoor is powdered dried mango, and it has a really neat tart flavour. I have to say that I don’t use this one all that often – it’s not that in many recipes that I come across, and I sometimes forget that I have it. Today was very different – this was the first thing I thought of when I decided to make chickpea salad.

It started with me coming across my stash of dried chickpeas. I decided to try cooking them up again, even though I have never been successful at this task. The price of canned legumes keeps going up so I thought I should give it another go. More on that later. Jump to a couple of days later, nicely cooked chickpeas at hand, and me coming up with ideas for my Indian-inspired chickpea salad. Summer salads should be fun, fresh, zesty, and exciting… ding, ding, ding!! I thought of the sour amchoor powder at the back of my spice drawer.

Mixed with other spices, such as cumin, coriander, tumeric and cayenne, I was able to make a very flavourful dressing that wasn’t heavy or creamy. I opted to add in some fresh veggies and fruits to round it out, including some just perfectly ripe apricots for a little more sweet and sour – I would have used mango, but apricots are in season here, and I thought something fresh and local would be best.

Dried Chickpeas

Dried Chickpeas

About the cooking of the chickpeas… in the past, I have failed miserably at cooking up dried legumes. They often came out mushy or mealy and just plain terrible. That said, buying them dried is much cheaper than buying them canned, so I thought it couldn’t hurt to try again.

I started with 2 cups of dried chick peas, soaking them in a LOT of water in the fridge. I read to soak them overnight, but I ended up soaking them for two (only because I didn’t have time to do anything with them right away). I discarded the soaking water each day, and just before cooking. I cooked them in a large pot of boiling water and it only took about 40 minutes (brought to a boil, then simmered). I tested along the way, just to ensure I didn’t overcook them. I should also add that I didn’t add anything to the soaking or cooking water – no salt, flour, baking soda… nothing. They cooked up perfectly. As good as canned, if not better. Two cups of dried chick peas probably yielded 5-6 cups of cooked, and it cost less than a 19oz can of chickpeas, which would only contain about 2.5 cups.

Recipe after the jump!

Continue reading Indian Chickpea Salad