Warm Chickpea Salad

Warm Chickpea Salad

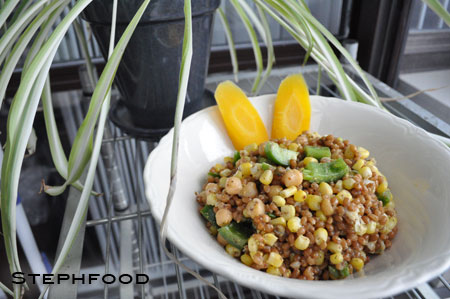
Salad season is almost upon us… almost. This chickpea dish can be served warm or cold, depending on how co-operative the weather is being :)

This time around, we ate it warm.

I just got a new zester, so I’m a little obsessed with putting lemon zest in stuff. I love the blend of lemon zest, olive oil and chili flakes. Oh so good!

I’m also a sucker for nicely sautéed leeks – white AND green parts, thankyouverymuch! Sometimes I just cook up a bunch of them, and add them to every dish. It makes a really good condiment.

To prepare leeks:

  • cut off the root end, and the dried tops
  • half each leek across where the white meets the green
  • half the white part lengthwise, and do the same for the greens (by breaking them where they fold)
  • WASH LEEKS VERY VERY WELL – dirt gets into the layers of the leek, so put them under running water and wash in between the layers as best you can
  • drain well

They take a bit of prep, but are really worth it! I usually prep the whole bunch at once, and keep them in a ziplock bag in the fridge.

Warm Chickpea Salad

Warm Chickpea Salad with Tomatoes and Parsley


Warm Chickpea Salad with Tomatoes and Parsley

Ingredients

  • 1 cup coarsely chopped parsley
  • zest and juice from 1 small or 1/2 large lemon (approximately 2 Tablespoons juice,  1 Tablespoon zest)
  • 1/4 – 1/2 teaspoon chili flakes (to taste)
  • 4 Tablespoons olive oil
  • 2 cups cooked chickpeas (roughly 1 can)
  • 1 leek, sliced into 1/4″ half rings
  • 1-2 cloves garlic, minced
  • 1/2 pint grape tomatoes, halved
  • salt and pepper, to taste

Preparation

  1. Make the dressing by combining the parsley, lemon juice, half of the lemon zest, about 1/4 teaspoon of the minced garlic, chili flakes and 3 tablespoons of olive oil. Mix, and set aside.
  2. In a sauté pan, add about a tablespoon of olive oil. Sauté the leeks until softened.
  3. Add the rest of the minced garlic, lemon zest and chili flakes and cook for another minute.
  4. Add the chickpeas and cook through, stirring regularly to coat with the other ingredients. Season with salt and pepper, to taste.
  5. Toss in the cherry tomatoes, remove from heat, and immediately toss with the dressing.

This dish is great served warm or cool!

Cavena Nuda Salad with Tangy Mustard Dressing

Cavena Nuda Salad

Now that the ‘good weather’ is here, I’m on the hunt for new and fun salads. There are so many rice and grain options to try, and I thought I had found a fun new rice to try out at my bulk store. This rice looked bigger than most rice, and was labelled “Cavena Nuda – Rice of the Prairies”.

Sounded pretty good to me! Little did I know that this “rice” was not rice at all…

Continue reading Cavena Nuda Salad with Tangy Mustard Dressing

Moroccan Chickpea and Apricot “Tagine”

Chickpea Apricot Tagine

I have had Moroccan food on my ‘to-do’ list for EVER!!! The problem is that I didn’t know where to start, dish-wise. Instead, I decided that I would have to make my own Ras el hanout blend first… and since I didn’t have some of the ingredients, I just kept putting it off.

Not only did I actually make a first attempt at Ras el hanout, but I made my own harissa and a dish to actually use them in! Now I’m both excited by the outcome, and disappointed by my procrastination.

Continue reading Moroccan Chickpea and Apricot “Tagine”

Back to Basics: How to cook dried Chick Peas

Dried Chickpeas

Cooking chick peas (garbanzo beans) from dried is easier than I thought! The trick is in the soaking – you need to soak them for at least 24 hours before cooking. I actually soak them for 2 days, and have such great results that I keep doing it that way.

One thing to keep in mind is that they expand quite a bit – my first try was with 2 cups of dried chick peas, which yielded about 6 cups of cooked chick peas. Yikes! These days, I do 1 cup at a time.

  1. In a large bowl, add 4 cups of cool water to 1 cup of dried chick peas.
  2. Put the bowl in the fridge for at least 24 hours to soak, changing the water every day.
  3. Every once in a while, stir the chick peas around a bit.
  4. To cook, boil a large pot of water. Add the chick peas, and return to the boil. Lower the heat, and simmer for about 40 minutes – but test to get the perfect texture!

The “Back to Basics” series is a collection of simple instructions, to be used as a reference for preparing some of the ingredients in the pantry. Mostly, it’s just a way for me to keep track of some of this info because I never remember the simple stuff!

My Very Own Thali

Indian Thali

I love Indian food. I love the spices, I love the mix of textures and flavours, and I absolutely love the variety you get in an Indian Thali. Indian thalis are platters that feature a number of dishes, alongside some kind of bread (such as naan or chapati) or sometimes rice. Most of the Indian food that people are familiar with  are from North India, but it is important to note that there are many regional differences in Indian food. This is something I’d like to learn a little bit about, but I haven’t started researching it yet.

Indian Thali

My first Thali (clockwise from the top): Baingan Bharta, Saag Paneer and Chole.

I love to make Indian-inspired dishes at home, but haven’t had much success at making restaurant style dishes until recently. A few weeks ago, I tried a Palak Daal recipe that was fantasic but very lonely. We’re used to having multiple dishes in an Indian meal, so my loney daal didn’t go over as well as it should have. This inspired me to try making a group of dishes at once.

There are two challenges for me here: successfully making restaurant-style Indian dishes AND making multiple dishes at the same time and timing it all out properly. It was a great experience, and left me with the confidence to try more in the future!!

Enjoy!

A mix of the spices I used in one of the dishes.
Recipes after the jump!