Daring Pierogi Ontariana

Pierogi Ontariana

The August 2010 Daring Cooks’ challenge is to make pierogi from scratch, highlighting flavours and ingredients from where you live.

I grew up eating handmade pierogi from the Ukranian church around the corner from our house. They were fairly traditional, cheese and potato, and very good. I don’t think I realized how good they were until I started buying pierogi from the freezer section of my grocery store. Not quite so good, but edible. Years later, we found incredible pierogi from a vendor at St. Lawrence Market and we’ve been buying his ever since – saurkraut & mushroom, and jalapeno & cheddar. Amazing.

I was tempted to try making saurkraut & mushroom pierogi for this challenge, but then I realized I probably couldn’t compete with the market guy and might end up disappointed. Instead, I chose to go with the ‘local flavours’ theme and use things that I could get from my garden or from the farmers at the market.

Today’s pierogi are filled with ingredients that are local to my home province – Ontario, Canada.

Pierogi Ontariana - Filling Ingredients

I came up with a combination of potato, sweet potato, rosemary, crunchy garlic scapes, Canadian old white cheddar and onions caramelized in maple syrup and Ontario beer. This combination of flavours is more like what I would have in the Fall, but all of these things are fresh and local now. I was really happy with how the filling turned out. I could taste the hint of maple syrup and beer, I could feel the slight texture added by the garlic scapes, the woodiness of rosemary and thyme, and the creaminess of the blend of potatoes.

With that taken care of, I had to tackle the dough. I’ve made fresh pasta before, but that dough is drier and I found the pierogi dough to be more difficult to handle.

Pierogi Ontariana -rolling pin

The dough was very sticky, and I had to add a LOT more flour to it. Apparently, this isn’t the way to do it — you’re supposed to slowly add the water to the flour and monitor the texture of the dough in the early stages, so you don’t have to try to ‘correct’ it with more flour later on. I’m learning as I go.

Pierogi Ontariana - pierogi mold

I had a bit of trouble rolling out the dough – the gluten had been worked enough to make it pretty elastic, and it wasn’t easy to roll it out thin. As a result, some of my pierogi were thinner than others. We also had quite  bit of the filling left over when we were done. I could have made another batch of dough, but instead we made croquettes with it the next night.

I always enjoy these kinds of meals. It’s a great project on a rainy day, and I find it almost therapeutic as you get into the process. Roll out the dough, cut the circles, add some filling, fold it over, pinch. Lather, rinse, repeat. It’s a great break from the computer.

In the end, the pierogi were declicious, imperfections and all. We topped them with some thick Balkan-style yogurt and green onions. I took half of the batch and froze it, so we would have some to enjoy later. We’ll see how well they freeze — I have a feeling they’ll be just fine, and I’ll be happy to enjoy the results of my hard work for a second time!

The August 2010 Daring Cooks’ Challenge was hosted by LizG of Bits n’ Bites and Anula of Anula’s Kitchen. They chose to challenge Daring Cooks to make pierogi from scratch and an optional challenge to provide one filling that best represents their locale.

Recipe after the jump!

Continue reading Daring Pierogi Ontariana

What do I do with this? Karela

Desi Karela / Bitter Gourd

This post should be subtitled, “Are you trying to poison me? My lips are going numb!”

I picked the strangest looking vegetable from BJ Supermarket, in the Gerrard India Bazaar. Its bumpy, bright green flesh was intriguing. The sign said ‘Desi Karela’ – I had never heard of it before, so I wrote it down.

A quick Google resulted in many pictures of half-naked girls. Oh wait, I mistakenly typed ‘Desi Kerala’ (Kerala being a state in India).

A quick correction brought me to the vegetable I was looking for… and it turned out to be Bitter Gourd. I had read about bitter gourd before – sometimes in recipes with no mention of the fact that this gourd is, in fact, evil. Other times, the author would curse the evil within, with comments such as “Why would anyone ever want to eat this?!”. Although frightened, I refused to give up and I found a recipe that sounded like the perfect way to introduce myself to Desi Karela.

Curried Bitter Gourd

I chose this recipe from Foodskaypes, because the mix of bitter gourd with coconut and tamarind sounded really tasty and different from the dishes I usually make. In case you are planning to click that link and read the recipe – no, I didn’t buy a fresh coconut and grate it for my dish. We aren’t used to fresh coconut here, so I bought the packaged (unsweetened) stuff. No doubt it isn’t as good as fresh, but you gotta do what you gotta do.

The dish smelled amazing as it was cooking. It was a fun assortment of spices (yay!), and I crossed my fingers that the karela wasn’t too bitter. Then I tasted the sauce. It was so bitter that my heart immediately sank, and I scolded myself for not making a backup dish. I knew J would NOT like this.

We sat down to eat, and I took my first bite. Yowza, that gourd is bitter! Bite two wasn’t so bad, and by bite three I noticed a flavour beyond the bitter that intrigued me, something I’m sure I haven’t tasted anywhere else. I looked up at J, who had also taken about three bites. “That’s about all I can do. My lips are going numb.” That was that. I finished his plate, and gave myself a little bit more, and he went to the fridge for some pitas and veggies.

I should mention that the recipe itself was great, and I’ll be trying it again with some other, less evil vegetable.

I don’t think I’ll be buying desi karela again, but I’m really happy I tried it once. The leftovers are still in my fridge, waiting for me to finish them. I’m kind of afraid of what it will taste like – you know how evil is when given time to collude.

Sorry, J. I swear I didn’t try to poison you!

Caprese Salad – A Summer Classic

Caprese Salad

Caprese salad is one of those things I take for granted. I think of this the way some people think of an iceberg salad – simple, fresh and super quick to make. I almost didn’t want to post this, because I figure everyone already makes Caprese salad. This post is for the folks who have never tried this delicious salad, or had it at a restaurant once and thought it must be more complicated than it looks (it isn’t).

The basic recipe contains very few ingredients: tomatoes; bocconcini or buffalo mozzarella; fresh basil and is dressed with a bit of olive oil, salt, pepper and sometimes (but not always) balsamic vinegar. This is a perfect salad for the summer, and a great break from leafy greens.

Cluster Tomatoes

Wee tomatoes growing in my balcony garden. So darn cute!

The star of the Caprese salad is the tomato. You really need to have the freshest, tastiest tomatoes that have no mealiness to them (so, really, beefsteak tomatoes are kind of out). I like to use Campari tomatoes (like the ones shown below), romas, cherry or grape tomatoes from the local farmers’ market… but my favourite new thing is to use tomatoes out of my own garden. This is the first time I’ve grown tomatoes, and I giggle every time I pick a tomato off of my plant. Nice.

There are many variations on this salad, but this follows the most basic set of steps. One really important thing to remember is that the slices of tomato should be a similar shape and size to that of the cheese. This can result in a salad made up of layered rows of ingredients, or a toss of chopped ingredients. It’s really up to you. I generally like the layered look. I really like the look of big slices of tomato layered with big slices of cheese — but that can be harder to eat, so I usually get the smaller balls of bocconcini to pair with cherry or grape tomatoes.

Tomatoes

Campari tomatoes, still on the vine.

Recipe after the jump!
Continue reading Caprese Salad – A Summer Classic

Indian Chickpea Salad

Indian Chickpea Salad

Today’s salad is inspired by Indian spices and flavour combinations. I’m obsessed with my collection of spices, and I was happy to be able to pull out some of my (recently ignored) Indian spices today.

Possibly the most exciting part for me is the amchoor powder. Amchoor is powdered dried mango, and it has a really neat tart flavour. I have to say that I don’t use this one all that often – it’s not that in many recipes that I come across, and I sometimes forget that I have it. Today was very different – this was the first thing I thought of when I decided to make chickpea salad.

It started with me coming across my stash of dried chickpeas. I decided to try cooking them up again, even though I have never been successful at this task. The price of canned legumes keeps going up so I thought I should give it another go. More on that later. Jump to a couple of days later, nicely cooked chickpeas at hand, and me coming up with ideas for my Indian-inspired chickpea salad. Summer salads should be fun, fresh, zesty, and exciting… ding, ding, ding!! I thought of the sour amchoor powder at the back of my spice drawer.

Mixed with other spices, such as cumin, coriander, tumeric and cayenne, I was able to make a very flavourful dressing that wasn’t heavy or creamy. I opted to add in some fresh veggies and fruits to round it out, including some just perfectly ripe apricots for a little more sweet and sour – I would have used mango, but apricots are in season here, and I thought something fresh and local would be best.

Dried Chickpeas

Dried Chickpeas

About the cooking of the chickpeas… in the past, I have failed miserably at cooking up dried legumes. They often came out mushy or mealy and just plain terrible. That said, buying them dried is much cheaper than buying them canned, so I thought it couldn’t hurt to try again.

I started with 2 cups of dried chick peas, soaking them in a LOT of water in the fridge. I read to soak them overnight, but I ended up soaking them for two (only because I didn’t have time to do anything with them right away). I discarded the soaking water each day, and just before cooking. I cooked them in a large pot of boiling water and it only took about 40 minutes (brought to a boil, then simmered). I tested along the way, just to ensure I didn’t overcook them. I should also add that I didn’t add anything to the soaking or cooking water – no salt, flour, baking soda… nothing. They cooked up perfectly. As good as canned, if not better. Two cups of dried chick peas probably yielded 5-6 cups of cooked, and it cost less than a 19oz can of chickpeas, which would only contain about 2.5 cups.

Recipe after the jump!
Continue reading Indian Chickpea Salad

Almond Pista Kulfi (a Bite of Blog Love)

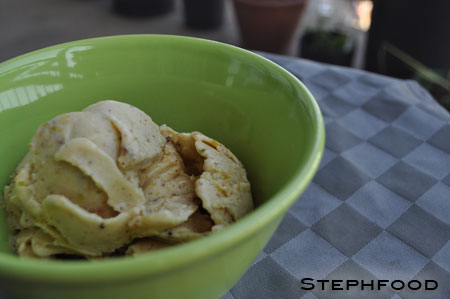
Almond Pista Kulfi -side

This post is part of a “Blog Bites” challenge issued by Nupur, of the blog One Hot Stove. This month, we’re asked to pick ANY recipe from the blog of our choice, make it, take pics and blog about it. The spirit of the “Blog Bites” challenge series is to get us checking out other food blogs and posting about our experiences, while giving due credit to the original poster. This also fits with the ‘Blog Love’ series I started back in June…

I had already found the perfect recipe when I saw the challenge. Sweet! (Literally)

I have always wanted to try making ice cream, but I don’t have an ice cream maker (and try not to buy unitasking gadgets). Summer brings a slew of amazing sounding ice cream recipes which, for the most part, just depress me into trying to justify making an ice cream maker (can I make dinner ice cream?).

Then I came across a recipe for Almond Pista Kulfi, posted by indosungod on Daily Musings.

Kulfi is an Indian frozen dessert that is made with milk, instead of cream, so doesn’t require an ice cream maker. They often come in flavours like mango, almond, pistachio – and can contain ground nuts. This recipe is a combination of almond and pistachio.

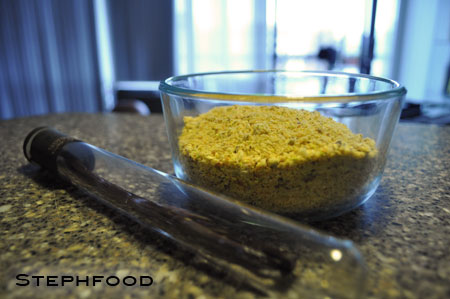
Ground Almonds, Pistachios and Vanilla Beans

Vanilla Beans with Ground Almonds and Pistachios.

I first had to roast my almonds and pistachios, and then grind them coarsely in the food processor. Since I had some on hand – and totally love them – I decided to add vanilla bean, as well as a few drops of almond extract.

You start by cooking down some whole milk and condensed milk on the stove, adding in a few ingredients and cooking it down a little more.

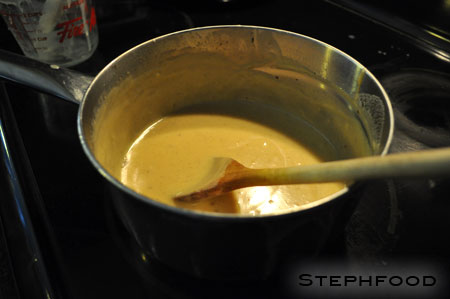
Making Almond Pista Kulfi

Making kulfi. It may be too thick already…

Here is where I ran into some trouble. Never having made kulfi before, I wasn’t sure how thick it should be. Initially, I followed the instructions, cooking the milk down for a certain amount of time. After adding in some ingredients and letting it thicken, you’re supposed to cook it down a little bit further. I did take it off earlier than it called for, thinking it was thick enough… but it was actually too thick. It was actually too sticky to freeze all the way through!

The next day, I decided I would try to fix things. I warmed up a little more of the whole milk and stirred it into the “semifreddo” concoction, crossed my fingers and stuck it back in the freezer. It worked!!

Writing instructions for these kinds of things can be tricky, because different stoves and cookware can cook things differently. Trial and error are definitely required! I now have a better idea of the consistency it should be when done. I know this sounds gross when talking about dessert, but it had the consistency of clam chowder (sans lumps) before freezing. Thick, coats the spoon, but not too sticky.

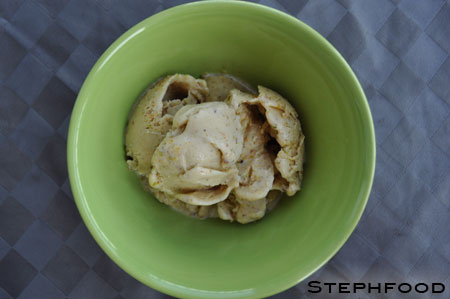
Almond Pista Kulfi - top

Back off! This bowl is MINE!

Sooo delicious! Once I’m done killing this batch, I’m going to make a cardamom coffee one!!! Can’t wait!!

Recipe after the jump!

Continue reading Almond Pista Kulfi (a Bite of Blog Love)

Grainy Mustard Potato Salad

Grainy Mustard Potato Salad

Potato salad is one of those typical summer things. I love a traditional potato salad, full of cooked egg and mayo, but sometimes you want something a little different. This potato salad contains no mayo, instead using deliciously tart yogurt for the creamy dressing. Like the traditional, this salad gets much flavour from mustard, but this time using grainy mustard for added texture. To top it off, some fresh tarragon (from the garden! woo!) and sour green apples give it a little kick.

When I first made this dish, modified from one we saw on TV many many years ago, I used Kozlik’s “Sweet & Smokey” mustard, purchased from the St. Lawrence Market here in Toronto. I don’t happen to have any on hand this time around (if only I had planned this in advance a little!), so I’ve added a couple of sweet & smoky elements to make up for it. If you are lucky enough to be able to find Kozlik’s mustards, I highly recommend using “Sweet & Smokey” in this recipe.

This dish reminds me of the first time I had the salad that serves as inspiration for this one. It was made for my university graduation, alongside some incredible grilled portabello mushrooms. That version of the salad had mayo, and a few other differences that I can’t recall (it really has been that long…), but it was a great starting point for me to explore alternatives to ye olde potato salad. I’ve been making it ever since.

Recipe after the jump!

Continue reading Grainy Mustard Potato Salad

Macarons

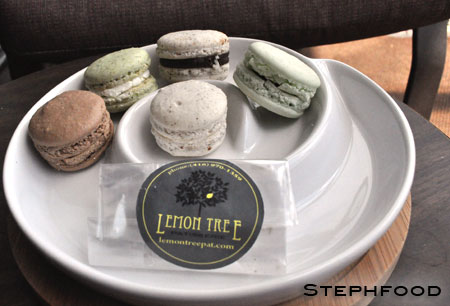
Lemon Tree Macarons - assortment

A while ago I mentioned how macarons are starting to eclipse the popularity of cupcakes. I still don’t think they have the mass appeal of cupcakes, but they are pretty special. Do a Google image search, and you’ll see why — while they all have a similar shape, they can come in bright jewel colours and complex flavours.

I first saw Lemon Tree macarons while in the throes of my cupcake obsession. Of course, every time I passed the little table at St. Lawrence Market, I was on my way to buy cupcake supplies for that weekend. Must buy macarons next time.

These macarons don’t really mess with the gimmicky stuff. They are all inspired by classic flavours, like mint, nut, caramel, mocha and chocolate.

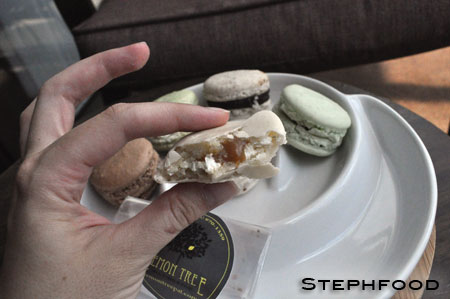
Lemon Tree Macarons - Salted Caramel

Delicious salted caramel – can you blame me for being greedy?

It took a couple of months, but I finally caved and bought a few. J and I shared them bite by bite, and found a delicious surprise in each.

Probably my favourite one, the only one I kept all to myself, was the salted caramel. You can’t tell from the outside, but inside there is a well of delicious flowing salted caramel. Sooooo good!

If you want these babies, you either have to make a custom order or buy a few from the select stock at their small table downstairs at the St. Lawrence Market (just next to Rube’s rice and bean island). You won’t regret it!!

Greeky Eggs

Greeky Eggs

I’m not a breakfast-making chick. When I wake up, I usually grab one of two things: a breakfast pita topped with almond or peanut butter; or a bowl of yogurt and granola. J does a little better on weekends, often making us some delicious waffles.

I wanted to make something special for once, so I pulled out an old copy of LCBO Food & Drink magazine, and made Baked Eggs with Feta and Dill.

Greeky Eggs - closer

This was a simple – but fun – dish to make. I got to use my cute little white ramekins, which rarely see the light of day. It looks and tastes more sophisticated than it actually was to make.

While this would be great at any time of year, I think this is one of those dishes that are best appreciated in the Spring and Summer. The light and fresh vegetable flavours are a perfect way to start the day. This would also be great as a part of a larger brunch spread, with some chilled white wine or mimosas (Darn! I knew I forgot something!).

The recipe can be found on the LCBO website: Baked Eggs with Feta and Dill. I always look forward to the seasonal Food & Drink magazines, both for the recipes and the fantastic photos. It’s like a food blog in paper form… what will they think of next!? (hahaha)

Daring Nut Butt

Rice Noodle Salad with Thai-style Cashew sauce and Shrimp

This month, we dare to make our own nut butters, and use them in a savoury dish. I’ve done the peanut sauce thing before, and have used ground almonds to thicken curries (almost counts as a nut butter… almost more of a nut flour, but close enough!). I’m totally open to having a nutty dinner.

Being busy as I have been lately, I took the path of least resistance and used cashew butter in a Thai-inspired noodle salad (one of the recommended recipes). I know I should have picked something a little more challenging for myself, but how could I resist a simple meal that was destined to be amazing?

Amazing it was. I am a sucker for this kind of thing.

Daring Cashew Butter and Roasted Cashews

Daring Cashew Butter and Roasted Cashews

First, I had to make the cashew butter. I figured it would taste that much better if I roasted the cashews first, so I quickly pan roasted them. Some of the oils escaped in the roasting, so I had to add some vegetable oil when I made the butter. My trusty food processor was great at grinding up the cashews, but they needed the extra oil to come together properly and form a paste. I probably would have thinned it out a little more but I knew I was making a sauce next, so I didn’t worry about it too much.

I decided to follow the sauce recipe as closely as possible. I was tempted to add some of the things I add to my own sauce, like keffir lime leaf, but I stayed pretty true to the recipe. What’s the point in remaking my own sauce recipes over again? I wanted to try something new. I chickened out about the amount of garlic, though. As much as I love garlic, 8 cloves sounded a little bit steep. I used 4, and it was plenty garlicky enough.

The July 2010 Daring Cooks’ Challenge was hosted by Margie of More Please and Natashya of Living in the Kitchen with Puppies. They chose to challenge Daring Cooks to make their own nut butter from scratch, and use the nut butter in a recipe. Their sources include Better with Nut Butter by Cooking Light Magazine, Asian Noodles by Nina Simonds, and Food Network online.

Recipe after the jump!
Continue reading Daring Nut Butt